What do all urban farmers in this brisk chilly climate need? Warm knit hats! It’s easy to make these using circular needles. I like to use number 8 needles and usually cast on about 95 stitches to start for an adult hat. Once the stitches are on I do a rib stitch with two knit to one purl stitch for about 8 to 10 rows; this will give the band some stretch.
A hat in process.
Now it’s time to use your creativity and go crazy with patterns and color using a knit stitch. Once you have 34 rows start decreasing to form the top of the hat. To decrease knit together two stitches every 10 stitches for one row then knit normally for the next.
All finished
As you get to the top of the hat knit stitches together every row then when there are a few stitches left use a darning needle to go through the remaining stitches and draw this tight. Now tuck in your yarn ends and you are all set!
The taste of fresh chevre is good beyond belief and when paired with fresh fall beets and pecans I feel like I’ve reached a gardener’s Valhalla. Surprisingly it’s not that hard to make. If you don’t have goats then check out your local farmers market.
Here’s my daughter with Biggie and Smalls.
First your goat needs to give birth. This starts her milk flowing.
Milking a goat is way easier than milking a cow!
Next you need to learn how to milk. This is a fairly easy thing to do but I found that I was using new muscles and I was kind of sore for a while.
Make sure your bucket is clean and your goat doesn’t kick it over. They love to do this towards the end of milking when they want to get down from the stand.
A gallon of milk is what most recipes call for.
Here’s the fresh milk in a pot on the stove.
Heat the milk to 160 degrees Fahrenheit to pasteurize it then put it in an ice water bath to cool it to 86 degrees.
I ordered this culture on line and it works great.
Add culture, stir and let sit for twelve hours.
It’s pretty amazing to see the transformation.
The curds are soft and almost creamy.
I got these molds on line as well.
Spoon the curds into chevre molds to let the whey drain off. This takes about 24 hours. The longer you let it drain the drier your cheese will be.
This is after about 24 hours of draining.
Once the cheese has drained take it out of the mold and cut it into the desired size.
I like doing small rounds so I can use lots of different spice mixtures.
I like to roll the cheese in herb and spice mixtures.
Ready for crackers or a luscious salad!
The first row on the left has been rolled in zahtar, an oregano based spice mix from the Middle East. The second row in a Thai spice and the third in a Japanese mix of toasted sesame seeds and salt.
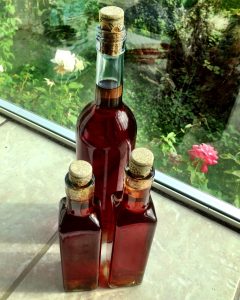
Last year I did the following post on plum wine. A couple of days ago I did the final bottling and it turned out very well; it tastes more like brandy than wine but it’s very drinkable. To do the bottling you sterilize your siphon and bottles then carefully decant the finished wine from the carboy into the bottle. The wine mellows as it ages so it’s advised to let the bottles lay on their sides in a cool place for another six months before drinking.
This year we have few plums but you could dry this recipe with other fruit like peaches or nectarines.
Finished plum wine.
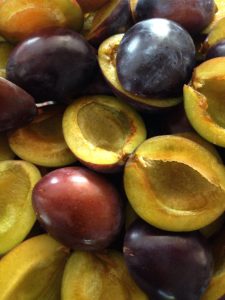
Recently my neighbor invited me to pick his plums. “Sure!” I said with avaricious glee. Later that night as the fruit flies multiplied in the plum filled sink and the smell of fruit on the edge filled the air I wondered what in the world I had done; my freezer was packed, my shelved were filled with dried and preserved fruit and by tomorrow this treasure would be compost.
“Wine!” I thought “I will make wine!” I had never done this before but desperate times call for desperate measures and as the unwashed dishes began to pile up and the flies reached a fever pitch of activity it was clearly time to do something.
Plums ready to become wine.
A survey of the internet showed a huge amount of differences in formulation. But after a while a few patterns did begin to emerge; most recipes needed campden tablets, pectic enzyme, yeast, acid and sugar. I ordered the more exotic items on-line, as well as a hydrometer and began to pit the plums.
Extras to make great wine.
Once the plums were pitted I weighed them out, covered them with boiling water, crushed and added a couple of campden tablets and let them sit overnight. The boiling water and tablets discourage the growth of unwanted organisms.
The next morning I added in the pectic enzyme and acid. The enzyme helps break down the fruit and the acid improves flavor and storage.
That night I made a sugar syrup and added this in.
Sugar syrup being made.
The following morning I put in a packet of yeast and covered it up to ferment.
All important yeast!
When I got home the house had a faintly alcoholic smell and the pot was foamy and bubbling. I took a hydrometer reading to see where the starting point was and recorded it on a page in my homesteading journal.
Hydrometer
To get a good reading you need a long tube so the device can float.
How to get a good hydrometer reading.
The fruit was also starting to break down. Each day I gave it a good stir with a clean spoon in the morning and at night to break the cap on it.
Cap on the wine.
After a week I siphoned it into a clean carboy, put the airlock on top and crossed my fingers.
Air lock
Now it needs to sit for six months then I will bottle it and hopefully have some lovely plum wine.
These are golden with a tinge of green; perfect for tortes but too tart to dry.
I dream not in sugar plums but in Italian prune and this year my dreams are all coming true; the neighbor’s tree is bursting with succulent blue fruit. I harvest the plums in succession for each recipe tastes best with a different level of tartness.
First up are the wonderful New York Times Plum Tortes. Over the years I have modified the recipe a bit and here is my version:
Plum Torte
Ingredients:
3/4 cup regular or brown sugar
1/2 cup butter
1 cup unbleached white or wheat flour, (if wheat is used it will raise less, you can also do a blend of flours)
1 teaspoon baking powder
If unsalted butter is used add in a pinch of salt
2 eggs
Enough halved and pitted plums to cover top of torte
Sugar and cinnamon to sprinkle on top
I use my food processor to make the batter.
1. Preheat oven to 350 degrees.
2. Cream sugar and butter in a bowl. Add flour, baking powder, salt and eggs, and beat well.
3. Put the batter in a pan. (I like to give these as gifts or make them ahead for potlucks so often used disposable aluminum pans.) Place the plum halves skin side up on top of the batter. Sprinkle lightly with sugar and cinnamon to taste.
4. Bake for 40 to 50 minutes. Remove and cool; refrigerate or freeze.
These tortes freeze beautifully but need to be cooled then well wrapped in foil.
I went out in the garden last night and found several tomatoes, a couple of handfuls of beans, a small zucchini, kale and Italian parsley. The chickens are all back laying in full force so we had plenty of eggs too. Time to make pasta primavera!
Wash and prepare your vegetables. Get your pasta making ingredients together: one egg, 2/3 cup flour, one teaspoon olive oil, one tablespoon water and 1/2 teaspoon salt. Mix dry ingredients then add wet. Mix until you get a ball that is moist but not wet. Put on a floured surface and flatten out with your hand. I use a pasta maker to do the final mixing and smoothing. Roll the pasta through until it is smooth and even then run it through the noodle cutting side. You can also roll out and cut the noodles with a knife. Hang the noodles. You can let them dry completely and store in a ziplock bag, use immediately or freeze them.
Lightly stir fry veggies
Drain the noodles, add the vegetables and top with parsley and grated parmesan cheese.
Making great pickles is easy! Here’s what you need:
Kosher or pickling salt A few grape leaves for crunchy pickles. Fresh cucumbers with the blossom end cut off to prevent softening. Garlic Dill Pack grape leaves, cucumbers, dill and garlic into clean jars and cover with brine solution.
Brine solution is made by dissolving 2 tablespoons of salt into a quart of water.
Cover and let the pickles sit until the desired level of fermentation is reached. They will be cloudy and bubbly.
It usually takes 5 to 10 days for pickles to ferment enough for a good, snappy taste. At this point you can put them in the fridge. They’ll continue to ferment but much more slowly.
Spinning with pet fur can be done! In this warm weather Mr. Bunners, aka Attila the Bun, is shedding his white fur in big soft billowy clumps. Petting him it felt sort of like cashmere so I decided to collect it and try spinning it into yarn. First I tried just the fur but the fibers are too short to do much. Next I carded it into some existing wool I had and that worked great. It also worked to lay the fur along the wool as I was spinning. I think this process would work for dog and cat fur too.
I’m looking at Angora rabbits with much more interest. Has anyone tried raising them or spinning their fur?
Natural wool fibers Wool with the bunny fur laid on it. Fur spun with wool using a drop spindle. Here’s what it looks like knit into a small square.
Each year I look at the riot of colorful flowers in my garden and want to save them for the dark winter months. One of the best ways I have found to do this is by making dried flower bouquets. After a lot of trial and error the plants that seem to work the best for this are chives, yarrow, money plant, lavender, hydrangea, oregano, pearly everlasting and grasses with showy seed sprays. Other flowers will dry but a lot of them fall apart or quickly fade.
To dry the flowers cut them with long stems and strip off the bottom leaves. Next tie them at the top with string or wire and hang them in a dark place until dry. I string a piece of rope across the rafters in my basement and hang the bunches from there. Once dry you can arrange them in whatever way you like.
Try out different flowers from your yard and let me know what you like to dry!
Bluebells dry well to a deep lavender color. When drying chives pick and hang them in a dark place before they open completely. Hydrangeas are always good for drying. Daisies are not thought of in dried bouquets but they dry quite nicely. Sea Holly dries well and has an interesting shape to it.
 A hat in process.
 All finished
 Here are some different examples.